Tuesday, August 14, 2012

72nd Scale T-34: The Base(ics)

Before I applied the final weathering, I wanted to construct the base to allow me to integrate the tank with its environment. I dove into my stash of bases I'd collected over the years for various figures and found one that would fit the scene I had in mind. I first scored the top surface with a box knife so that the glue would better adhere to it.


I then carved a piece of florist foam to the basic shape, masked off the sides of the wooden base, and glued the foam to the base with scenic cement (which I suspect is nothing more than a higher-priced white glue with a matte agent added).


I mixed a batch of Aves ClayShay and applied it with a spatula to the top surface of the foam. This is some of the best ground material I've found. Depending on how you mix it, you can use it either as a clay (thick) or as a mache (thin). When it was partially dried I pressed the tank into the surface so that it would appear sunken into the ground and added a few scale rocks to the surface.


Next up will be painting and adding additional ground work.

Saturday, August 11, 2012

Ivan and Boris: Assembly and Priming


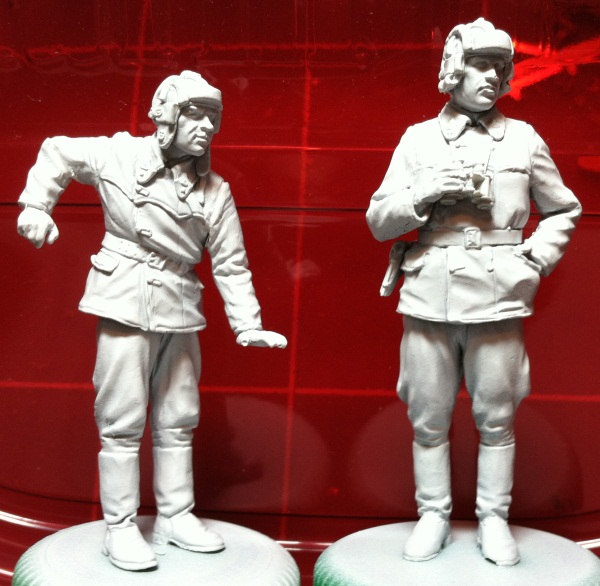
I assembled the two Russian tanker figures, officer and crewman, and attached them to plastic bottle caps with CA adhesive for ease of handling during painting. As a fan of all things Vallejo, I filled the seams with Vallejo Plastic Putty (70400) and then set both aside to dry.

I used the point of a #11 blade to clean up the seams and then gave each figure several light coats of Tamiya White Fine Surface Primer from the ol' rattle can.


In addition to highlighting any areas that need further cleaning, the white primer brings out the details in the figures and gives a nice base for the application of the finish colors.

Friday, August 3, 2012

Comrade!


Needing a crew for my 35th scale T-34, I dove into my "parts and figures" box and found the Tank figure set, "Russian AFV Crew, 1941." I also have a couple of Alpine sets but I think I'll save them for future builds, unless the Tank set doesn't work out. Given the pose of the figure in the hatch, I'll do some initial construction on the turret to see how he will work.

Here's a photo of the figures themselves prior to clean-up, construction, and painting:

35th Scale T-34: Upper Hull & Front Plate


Next up was the upper hull. I first attached the engine access hatch and then carefully sanded the openings to ensure a proper fit of the molded radiator and air intake grills. The rectangular opening at the rear is for the engine fan screen assembly which I plan on constructing from the included PE rather than using the one-piece molded plastic as I did on the 72nd scale model. At this scale you WILL notice the difference!


The front plate offered a bit more in the way of assembly. I fitted and glued the driver's hatch cover along with the three periscopes. I then attached the machine gun and its armored hood and the two front towing shackles.

Two special notes here. First, Dragon has included the protective collar bridging the gap between the driver's hatch and the front hull plate. These armored strips were attached to protect the crew when the tank came under machine gun fire. Second, the front towing shackles included in the kit are of the design seen on experimental and early production versions of the T-34/76. The front shackles usually seen in photos of the T-34 are of the "rams horn" variety (and are the ones used on my 72nd scale model).

For reference, I highly recommend the softcover book, T-34 Medium Tank (1939-1943), by Mikhail Baryatinskiy. It is Volume 4 in the Russian Armour series by Ian Allan Publishing.

Thursday, August 2, 2012

Scale Comparison


For anyone not familiar with the scale difference between 1/35th and 1/72nd scales, the photo above shows my "almost completed" 72nd scale T-34 sitting on top of the over-turned hull of my "just started" 35th scale T-34.

35th Scale T-34: Hull Bottom


While trying to decide how to base my smaller T-34, I thought I'd begin construction on the larger one. I skipped the first step of constructing the road wheels, idlers, and drive sprockets as they will be painted off the model and attached much later with the tracks.

I began with the lower hull. After some very slight clean-up on the bottom, I removed one of the bump stops on each side for the most forward suspension arms (per the instructions). I'm assuming that the front double bump stops were features of other T-34 variants. The coil spring suspension is nicely reproduced through the use of ten rectangular boxes (actually parallelograms!) added to the inner hull on which the springs are molded. These are visible through slots in the hull as shown in the photo below.


I then added the suspension arms and pieces of the transmission housing. I did not attach the idler wheel arms as they can be rotated to tighten or loosen the tracks and I want to be able to make that adjustment later if necessary.

To complete these initial steps I then attached the front and rear hull sections and the hatches on the hull bottom.

Monday, July 23, 2012

Catching Up

Given the weather, summertime, etc., it's been a month since I last posted. So here's  an update on my active projects.


T-34/76 Model 1941 Cast Turret, 72nd Scale:
Most of the stowage has been added and painted but not shaded. I added rolled tarps to each side, extra track links to the front and right side, and a tow cable and shovel to the left side. I'm still going to add a chain to the front of the hull and that should do it for this go-round.

Next I'll airbrush the lower hull and running gear with a brown-black mixture and then apply an overall flat finish to the model. After that it's on to adding some scratches, possibly some dry brushing if I need to bring out some details, and then a light dust coat. While all that is in progress, I'll be prepping a base and groundwork.

I'm still not totally happy with the darkness of the green finish (it's MUCH darker than in the photo above), but I'll correct that on other Russian tanks!


Steyr 1500A/01:
Shown above are the two radio tables with most of the equipment attached. Next up is drilling all the holes for the wiring. I have several packages of lead wire in thicknesses ranging from 0.2mm to 1.0mm which I'll be using and have also picked-up a couple spools of fly tying wire, just in case. I'm still trying to noodle-out the best order for wiring, painting, and attaching all this to the Steyr itself. I have a feeling that my experience in rigging model ships will come in handy!


T-34/76 Model 1941 Cast Turret, 35th Scale:
Yes, another Russian tank! I enjoyed the Dragon 72nd scale T-34 so much that I found its "big brother"--almost the same model in 35th scale! The only differences that I have seen so far lie in the stowage and the hull attachments. This kit does not include the large auxiliary fuel tanks attached to the rear deck but I found a set of aftermarket PE from Aber that should do the trick nicely. My plan is to build it out-of-the-box with the exception of those fuel tanks.